How To Create Fantastic Illustration With Movavi Photo Editor
https://www.imustread.com/2017/07/how-to-create-fantastic-illustration.html
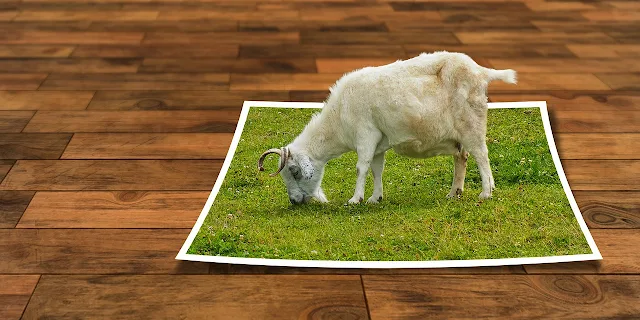
Creating a photo montage involves combining two or more photos together to form a piece of artwork. To create a photo montage, you need a software that can cut out objects in different photos.
There is basic photo editing software that can do this such as Movavi Photo Editor. Movavi Photo Editor offers a wide range of tools for customizing your photos for use in creating the photo montage. The following are the four steps on how to use Movavi Photo Editor to create a photo montage.
If you want to create a photo montage illustration, the first step that you should take is to upload your photos to the work area. Opening image files in Movavi Photo Editor can be easily done by simply dragging the pictures or folder into the gray empty space.

Next, you need to look for the background removal tab and click on it. This will bring you to the background removal tool and you are to select the green brush tool to mark the main subject. You can use the red brush tool to mark the background that you want to delete after you have made a selection on the main subject with the green brush tool. The red brush tool is not only used for marking an unwanted background. In fact, anything that is marked in red with the red brush tool can be removed.
After that, you must click on the Set New Background button to cut out the unwanted elements. In just a few seconds, all the unwanted elements are being deleted and this leaves the area to transform into a transparent background. You must now save the photo in a transparent background in formats like png, and GIF. Saving the photo with the transparent background in other formats like JPG can result in a white background which will render it not suitable for creating a photo montage illustration. You can repeat the same steps for all the photos that you want to derive some objects from them for use in making the photo montage.
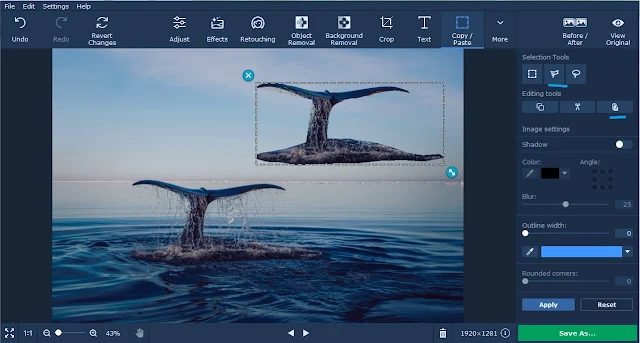
The next step is to merge all photos together into a single photo montage. Firstly, you must open the photo that is to be used as the background for the photo montage by clicking on the Add Media Files button. After the background image is load, you can then drag from your desktop the photos of the items that you want to integrate into the background to create the photo montage. You can drag the photos one by one to avoid making a mess. After dragging one photo to the desired position, you can go ahead to drag another photo into the work area.
When you select a photo, you can resize it to become larger or smaller by dragging the corner. You can also rotate the selected photo in the work area by clicking on the round two arrows button on the lower right corner of the dotted frame. You can add an outline to the selected photo by dragging the outline width slider. You can also add some shadow by selecting the photo and drag the shadow slider. The opacity level of the photo can also be adjusted by dragging the opacity slider
1. Open All the Pictures that You Want to Use in the Work Area
If you want to create a photo montage illustration, the first step that you should take is to upload your photos to the work area. Opening image files in Movavi Photo Editor can be easily done by simply dragging the pictures or folder into the gray empty space.
2. Cut Out Items from Your Pictures with Background Removal Tool
Next, you need to look for the background removal tab and click on it. This will bring you to the background removal tool and you are to select the green brush tool to mark the main subject. You can use the red brush tool to mark the background that you want to delete after you have made a selection on the main subject with the green brush tool. The red brush tool is not only used for marking an unwanted background. In fact, anything that is marked in red with the red brush tool can be removed.
After that, you must click on the Set New Background button to cut out the unwanted elements. In just a few seconds, all the unwanted elements are being deleted and this leaves the area to transform into a transparent background. You must now save the photo in a transparent background in formats like png, and GIF. Saving the photo with the transparent background in other formats like JPG can result in a white background which will render it not suitable for creating a photo montage illustration. You can repeat the same steps for all the photos that you want to derive some objects from them for use in making the photo montage.
3. Arranging Your Photos to Create a Photo Montage Masterpiece
The next step is to merge all photos together into a single photo montage. Firstly, you must open the photo that is to be used as the background for the photo montage by clicking on the Add Media Files button. After the background image is load, you can then drag from your desktop the photos of the items that you want to integrate into the background to create the photo montage. You can drag the photos one by one to avoid making a mess. After dragging one photo to the desired position, you can go ahead to drag another photo into the work area.
When you select a photo, you can resize it to become larger or smaller by dragging the corner. You can also rotate the selected photo in the work area by clicking on the round two arrows button on the lower right corner of the dotted frame. You can add an outline to the selected photo by dragging the outline width slider. You can also add some shadow by selecting the photo and drag the shadow slider. The opacity level of the photo can also be adjusted by dragging the opacity slider
4. Save Your Photo Montage
When you are done, don’t forget to click the save button to save your photo montage. You can choose to save your photo montage in JPEG quality 70 – 80% to compress the photo a bit without losing much details.
In conclusion, Movavi Photo Editor can transform photos that you think are nothing special into a breathtaking photo montage. It offers a large work area for you to arrange the photos so that you can tell a story with it.
Conclusion
In conclusion, Movavi Photo Editor can transform photos that you think are nothing special into a breathtaking photo montage. It offers a large work area for you to arrange the photos so that you can tell a story with it.
ReplyDeleteنقل عفش
نقل عفش من الرياض الى مصر شركة شحن من الرياض الى مصرمن الباب للباب
شركة شحن عفش من المدينة لمصر شركة شحن عفش من المدينة لمصر
wow
ReplyDelete